SPF, DKIM & DMARC: Ne Oldukları, Nasıl Kurulur ve Neden Önemli
E-postalarınız iyi hazırlanmış. Listeniz temiz. Gönderim programınız tutarlı. Ama açılma oranlarınız düşüyor ve Gmail sizi sürekli spam'e atıyor. Sorun gönderdikleriniz olmayabilir -- sorun, gerçekten siz olduğunuzu kanıtlamamış olmanız olabilir.
E-posta kimlik doğrulama, alan adınızdan geldiğini iddia eden bir e-postanın gerçekten alan adınızdan geldiğini posta kutusu sağlayıcılarına kanıtlama yönteminizdir. Bu olmadan, herhangi biri "Kimden" adresinizi taklit edebilir ve markanızmış gibi davranarak oltalama e-postaları gönderebilir. Posta kutusu sağlayıcıları bunu bilir -- bu yüzden kimlik doğrulaması yapılmamış e-postalar varsayılan olarak şüpheli kabul edilir.
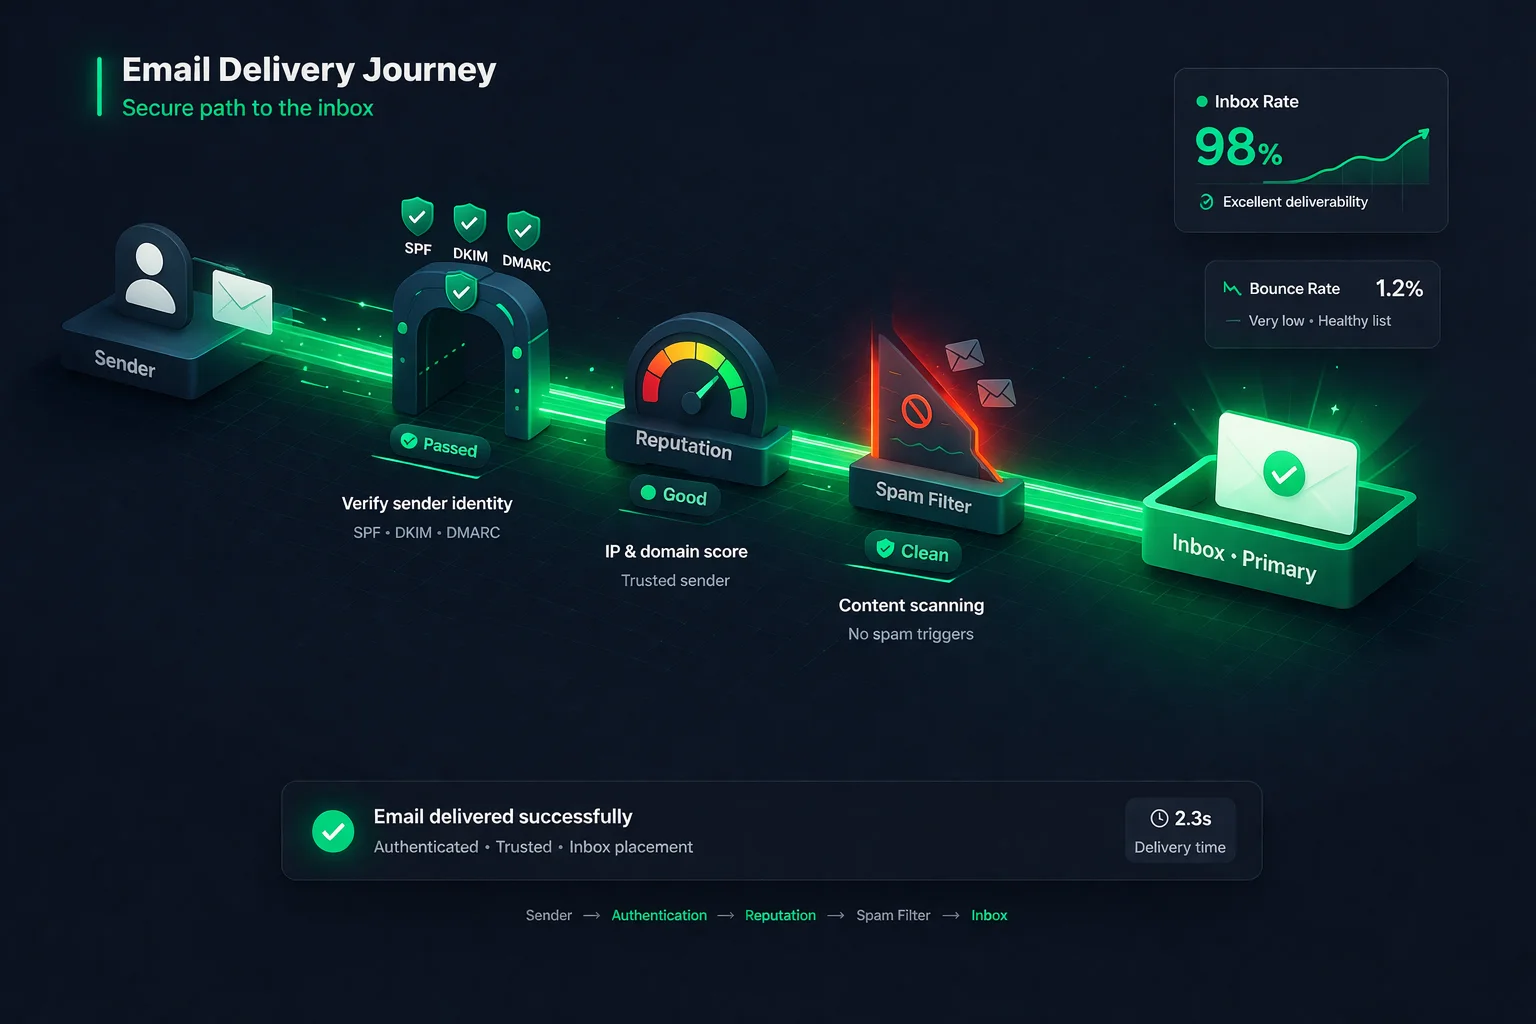
E-posta kimlik doğrulamanın omurgasını üç protokol oluşturur: SPF, DKIM ve DMARC. Birlikte, alıcı sunuculara sizin adınıza kimin gönderim yapabileceğini, mesajların değiştirilmediğini ve bir şey başarısız olduğunda ne yapılması gerektiğini söylerler. Bu rehberde, üçünü de anlaşılır bir dille açıklayacak, her birini tam olarak nasıl kuracağınızı gösterecek ve deneyimli göndericileri bile yanıltan hataları ele alacağız.
E-posta Kimlik Doğrulama Nedir?
Posta servisi aracılığıyla bir mektup gönderdiğinizde, alıcı iade adresini görebilir -- ama herhangi biri zarfa herhangi bir iade adresi yazabilir. E-posta da aynı şekilde çalışır. Bir e-postadaki "Kimden" alanı sadece bir metindir. Kimlik doğrulama olmadan, bir spam gönderenin siz@alanadi.com adresinden geliyormuş gibi görünen bir e-posta göndermesini engelleyen hiçbir şey yoktur.
E-posta kimlik doğrulama, mesajlarınıza doğrulanabilir kanıt ekleyerek bu sorunu çözer. Alıcı posta sunucularının üç soruyu yanıtlamasına olanak tanıyan bir dizi DNS kaydı ve kriptografik teknikten oluşur:
- Bu sunucu, bu alan adı için e-posta göndermeye yetkili mi? (SPF)
- Bu mesaj gönderildikten sonra değiştirilmiş mi? (DKIM)
- Kimlik doğrulama başarısız olursa ne yapmalıyım? (DMARC)
Bunu kapıda kimlik göstermeye benzetebilirsiniz. SPF davetli listesidir. DKIM, girişte doğrulandığınızı kanıtlayan bilekliktir. DMARC ise biri eşleşmediğinde ne yapılacağına dair güvenlik görevlisinin talimatlarıdır.
SPF Açıklaması
SPF nedir
SPF (Sender Policy Framework), alan adınız adına e-posta göndermeye yetkili her IP adresini ve posta sunucusunu listeleyen bir DNS TXT kaydıdır. Alıcı bir sunucu alan adınızdan bir e-posta aldığında, gönderen sunucunun IP adresinin onaylı listede olup olmadığını kontrol etmek için SPF kaydınıza bakar.
IP eşleşirse, SPF geçer. Eşleşmezse, SPF başarısız olur -- ve alıcı sunucu e-postanın sahte olabileceğini anlar.
SPF nasıl çalışır (adım adım)
- E-posta servis sağlayıcınız (ESP) aracılığıyla
hello@alanadi.comadresinden bir e-posta gönderirsiniz. - Alıcı sunucu, e-postanın
alanadi.comadresinden geldiğini iddia ettiğini görür. alanadi.comiçin DNS'teki SPF kaydını arar.- SPF kaydı şöyle bir şey söyler: "Benim adıma yalnızca şu sunucular gönderim yapabilir: 192.0.2.1 ve Mailchimp'in SPF kaydında listelenen her şey."
- Alıcı sunucu, e-postayı gerçekten gönderen IP'nin SPF kaydıyla eşleşip eşleşmediğini kontrol eder.
- Eşleşirse: SPF geçer. Eşleşmezse: SPF başarısız olur.
SPF nasıl kurulur
SPF kurmak, alan adınızın DNS'ine tek bir TXT kaydı eklemeyi gerektirir. Tipik bir SPF kaydı şöyle görünür:
v=spf1 include:_spf.google.com include:servers.mcsv.net -allBunu parçalara ayıralım:
v=spf1-- bunun bir SPF kaydı olduğunu belirtirinclude:_spf.google.com-- Google Workspace'in alan adınız için gönderim yapmasına yetki veririnclude:servers.mcsv.net-- Mailchimp'in alan adınız için gönderim yapmasına yetki verir-all-- alıcılara yukarıda listelenmeyen herhangi bir sunucudan gelen e-postayı reddetmelerini söyler
Kurmak için: DNS sağlayıcınıza (GoDaddy, Cloudflare, Namecheap, vb.) giriş yapın, DNS kayıtlarına gidin, host olarak @ (kök alan adınız) ayarlanmış yeni bir TXT kaydı ekleyin ve SPF değerinizi yapıştırın. ESP'niz tam olarak neyi eklemeniz gerektiğini söyleyecektir -- belgelerini kontrol edin.
Yaygın SPF hataları
- Birden fazla SPF kaydı. Alan adınızın yalnızca bir SPF kaydı olabilir. İkinci bir tane eklerseniz (örn. biri Google için, biri Mailchimp için), ikisi de bozulur. Birden fazla
include:ifadesi kullanarak bunları tek bir kayıtta birleştirin. - Çok fazla DNS sorgusu. SPF'in 10 DNS sorgusu sınırı vardır. Her
include:bir sorgu olarak sayılır ve iç içe include'lar da sayılır. 10'u aşarsanız, gönderdiğiniz her e-posta için SPF otomatik olarak başarısız olur. Sınıra ulaşıyorsanız bir SPF düzleştirme aracı kullanın. -allyerine+allkullanmak.+allbayrağı "herkesin alan adım olarak gönderim yapmasına izin ver" anlamına gelir -- bu da SPF'in tüm amacını ortadan kaldırır. Her zaman-all(kesin red) veya en azından~all(yumuşak red) kullanın.- Üçüncü taraf göndericileri unutmak. CRM, yardım masası veya işlemsel e-posta servisi kullanıyorsanız, onların sunucularının da SPF kaydınızda olması gerekir. Yaygın bir senaryo: pazarlama e-postaları SPF'i geçer, ama yardım masanızdan gelen işlemsel e-postalar başarısız olur çünkü eklemeyi unutmuşsunuzdur.
DKIM Açıklaması
DKIM nedir
DKIM (DomainKeys Identified Mail), gönderdiğiniz her e-postaya kriptografik bir dijital imza ekler. Bu imza, yalnızca gönderim sunucunuzun sahip olduğu özel bir anahtar kullanılarak oluşturulur. Karşılık gelen genel anahtar, herkesin imzayı doğrulayabilmesi için DNS'inizde yayınlanır.
Yalnızca gönderim sunucusunu kontrol eden SPF'in aksine, DKIM e-postanın içeriğinin gönderildikten sonra değiştirilmediğini doğrular. Birisi e-postanızı ele geçirir ve değiştirirse, DKIM imzası bozulur ve alıcı sunucu mesajın kurcalandığını anlar.
DKIM nasıl çalışır (adım adım)
- E-posta sunucunuz, e-posta başlıkları ve gövdesinin benzersiz bir kriptografik hash'ini oluşturur.
- Bu hash'i özel anahtarınızla imzalar ve imzayı e-posta başlığına
DKIM-Signaturealanı olarak ekler. - Alıcı sunucu DKIM imzasını görür ve ondan seçici (selector) ile alan adını çıkarır.
- Seçiciyi kullanarak DNS'inizdeki genel anahtarı arar (örn.
selector1._domainkey.alanadi.com). - E-posta içeriğiyle imzayı doğrulamak için genel anahtarı kullanır.
- İmza eşleşirse: DKIM geçer. Eşleşmezse: DKIM başarısız olur (mesaj değiştirilmiş veya anahtar eşleşmiyor).
DKIM nasıl kurulur
DKIM kurulumu, e-posta sağlayıcınızın bir anahtar çifti oluşturmasını gerektirdiği için SPF'e göre biraz daha karmaşıktır. İşte genel süreç:
- ESP'nizde DKIM anahtarlarını oluşturun. E-posta sağlayıcınızın ayarlarına gidin ve "DKIM" veya "E-posta Kimlik Doğrulama" bölümünü arayın. Çoğu sağlayıcı (Google Workspace, Mailchimp, SendGrid, vb.) anahtarları sizin için oluşturacak ve eklenecek bir DNS kaydı verecektir.
- DKIM kaydını DNS'inize ekleyin.
google._domainkeygibi bir host ve genel anahtarı içeren uzun bir değere sahip bir TXT veya CNAME kaydı alacaksınız. Bunu DNS sağlayıcınıza ekleyin. - ESP'nizde DKIM'i etkinleştirin. Bazı sağlayıcılar, DNS kaydını ekledikten sonra "Kimlik doğrulamayı başlat" veya benzeri bir düğmeye tıklamanızı gerektirir. Bu adımı atlamayın.
- Çalıştığını doğrulayın. Bir test e-postası gönderin ve e-posta başlıklarında
dkim=passolup olmadığını kontrol edin. Çoğu ESP, DKIM durumunu panolarında da gösterir.
Bir DKIM DNS kaydı yaklaşık olarak şöyle görünür:
Host: google._domainkey.yourdomain.com
Type: TXT
Value: v=DKIM1; k=rsa; p=MIIBIjANBgkqhkiG9w0BAQEFAAOCAQ8A...
Yaygın DKIM hataları
- Tüm göndericiler için DKIM kurmamak. Kullandığınız her e-posta servisinin kendi DKIM anahtarına ihtiyacı vardır. Google Workspace için DKIM kurduysanız ama Mailchimp için kurmadıysanız, Mailchimp'ten gelen e-postalar DKIM kontrolünde başarısız olacaktır.
- Anahtar uzunluğunun çok kısa olması. En az 1024-bit anahtarlar kullanın, ancak 2026'da standart 2048-bit'tir. Bazı sağlayıcılar hâlâ varsayılan olarak 1024 kullanır -- mümkünse yükseltin.
- Anahtarları döndürmemek. Zorunlu bir döndürme programı olmasa da, DKIM anahtarlarını yıllık olarak döndürmek en iyi güvenlik uygulamasıdır. Özel bir anahtar ele geçirilirse, biri alan adınız olarak e-postaları imzalayabilir.
- DNS kaydının tek bir TXT girişi için çok uzun olması. Bazı DNS sağlayıcılarının TXT kaydı başına 255 karakter sınırı vardır. 2048-bit anahtarınız bunu aşarsa, birden fazla tırnaklı dizgeye bölmeniz gerekebilir. ESP'nizin belgeleri size nasıl yapılacağını gösterecektir.
DMARC Açıklaması
DMARC nedir
DMARC (Domain-based Message Authentication, Reporting and Conformance), SPF ve DKIM'i bir araya getiren ve kritik bir eksik parçayı ekleyen protokoldür: bir politika. DMARC, alan adınızdan gelen bir e-posta kimlik doğrulamada başarısız olduğunda alıcı sunuculara ne yapmaları gerektiğini söyler.
DMARC olmadan, alıcı sunucuların tahmin yürütmesi gerekir. E-postayı yine de teslim etmeli mi? Spam klasörüne mi atmalı? Tamamen reddetmeli mi? Her sunucu kendi kararını verir. DMARC, DNS'inizde net bir politika yayınlayarak kararı size bırakır.
DMARC ayrıca hizalama (alignment) kavramını da getirir. SPF ve DKIM, e-posta başlığının farklı bölümlerini kontrol eder. DMARC, en az birinin görünür "Kimden" adresindeki alan adıyla -- alıcılarınızın gerçekten gördüğü adresle -- "hizalanmasını" gerektirir. Bu, bir saldırganın bir alan adıyla SPF'i geçip alıcıya tamamen farklı bir alan adı gösterebildiği bir açığı kapatır.
DMARC politikaları: none, quarantine ve reject
DMARC üç politika seviyesi sunar:
p=none (Yalnızca İzleme)
Buradan BaşlayınAlıcı sunucular, kimlik doğrulama sonuçlarından bağımsız olarak tüm e-postaları teslim eder, ancak size raporlar gönderir. Bu "gözlem modu"dur -- bir politikayı uygulamaya koymadan önce tüm meşru göndericileri keşfetmek için kullanın.
p=quarantine
Orta SeviyeKimlik doğrulamada başarısız olan e-postalar spam/önemsiz klasörüne gönderilir. Yetkili göndericilerden gelen meşru e-postalar hâlâ gelen kutusuna ulaşır. Her şeyin çalıştığını doğrularken bu iyi bir ara adımdır.
p=reject
Maksimum KorumaKimlik doğrulamada başarısız olan e-postalar tamamen engellenir -- alıcıya hiçbir zaman ulaşmaz, spam'de bile değil. Bu, alan adı sahteciliği ve markanıza yönelik oltalama saldırılarına karşı en güçlü korumayı sağlar.
DMARC nasıl kurulur
DMARC, DNS'inizdeki tek bir TXT kaydıdır. İşte önerilen yaklaşım:
Adım 1: İzleme ile başlayın. Bu TXT kaydını DNS'inize ekleyin:
Host: _dmarc.yourdomain.com
Type: TXT
Value: v=DMARC1; p=none; rua=mailto:dmarc-reports@yourdomain.comv=DMARC1-- bunun bir DMARC kaydı olduğunu belirtirp=none-- yalnızca izleme, başarısızlıklarda işlem yapmarua=mailto:...-- toplu raporların gönderileceği adres (alan adınız olarak kimlerin gönderim yaptığını ve kimlik doğrulamayı geçip geçmediklerini gösteren XML raporlar)
Adım 2: Raporları 2-4 hafta boyunca inceleyin. Büyük posta kutusu sağlayıcılarından XML raporlar alacaksınız. Bu raporlar, alan adınızı kullanarak e-posta gönderen her IP adresini ve SPF/DKIM'in geçip geçmediğini gösterir. Verileri okunabilir hale getirmek için bir DMARC rapor analiz aracı (dmarcian veya EasyDMARC gibi) kullanın. Hedefiniz: tüm meşru göndericilerinizin hem SPF hem de DKIM'i geçtiğinden emin olmak.
Adım 3: Quarantine'e geçin. Tüm meşru e-postaların geçtiğinden emin olduğunuzda:
v=DMARC1; p=quarantine; rua=mailto:dmarc-reports@yourdomain.comAdım 4: Reject'e geçin. Birkaç hafta daha temiz raporlardan sonra:
v=DMARC1; p=reject; rua=mailto:dmarc-reports@yourdomain.comÖnce izleme yapmadan asla doğrudan p=reject'e geçmeyin. Meşru bir gönderici düzgün şekilde kimlik doğrulaması yapmamışsa, e-postaları sessizce düşürülecektir -- ve birisi mesajınızı hiç almadığından şikayet edene kadar bunu bilemezsiniz.
Yaygın DMARC hataları
- Doğrudan p=reject'e geçmek. Bu en tehlikeli hatadır. Kimlik doğrulaması yapılmamış unutulmuş bir üçüncü taraf gönderiniz (eski CRM, yardım masası, işlemsel e-posta servisi) varsa, e-postaları hiçbir uyarı olmadan engellenecektir.
- Raporlama adresi (rua) ayarlamamak. Raporlar olmadan, körlemesine uçuyorsunuz. Meşru e-postaların başarısız olup olmadığını veya birinin alan adınızı taklit edip etmediğini bilemezsiniz.
- DMARC raporlarını görmezden gelmek.
p=nonekurup raporlara hiç bakmamak amacı ortadan kaldırır. İzlemenin tüm amacı, bir politikayı uygulamaya koymadan önce sorunları bulmaktır. - Hizalama sorunları. DMARC, SPF veya DKIM'deki alan adının görünür "Kimden" alan adıyla eşleşmesini (hizalanmasını) gerektirir. ESP'niz farklı bir alan adından gönderim yapıyor ve alan adınızın DKIM'iyle imzalamıyorsa, SPF geçse bile DMARC başarısız olacaktır.
SPF vs. DKIM vs. DMARC: Karşılaştırma
İşte her protokolün ne yaptığına ve neye karşı koruma sağladığına yan yana bir bakış:
| SPF | DKIM | DMARC | |
|---|---|---|---|
| Ne yapar | Yetkili gönderim sunucularını listeler | E-postalara kriptografik imza ekler | Kimlik doğrulama başarısızlıkları için politika belirler |
| DNS kayıt türü | Kök alan adında TXT | selector._domainkey üzerinde TXT veya CNAME | _dmarc alt alan adında TXT |
| Neyi doğrular | Gönderim sunucusu IP'sinin yetkili olduğunu | Mesaj içeriğinin değiştirilmediğini | SPF/DKIM'in görünür Kimden alan adıyla hizalandığını |
| Önlediği şey | Yetkisiz sunucuların sizin adınıza gönderim yapması | E-postanın iletim sırasında kurcalanması | Alan adı sahteciliği ve oltalama |
| Tek başına çalışır mı? | Kısmen -- Kimden başlığını kontrol etmez | Kısmen -- başarısızlıkta politika yok | Hayır -- SPF ve/veya DKIM gerektirir |
| 2026'da zorunlu mu? | Evet -- Gmail ve Yahoo gerektiriyor | Evet -- Gmail ve Yahoo gerektiriyor | Evet -- toplu göndericiler için zorunlu |
Ana çıkarım: her protokol farklı bir boşluğu kapatır. SPF tek başına görünür "Kimden" adresini doğrulamaz. DKIM tek başına kimlik doğrulama başarısız olduğunda alıcılara ne yapmaları gerektiğini söylemez. DMARC tek başına, kendisini destekleyecek SPF veya DKIM olmadan çalışmaz. Üçünün birlikte çalışmasına ihtiyacınız var.
Kimlik Doğrulama Teslim Edilebilirliği Nasıl Etkiler
E-posta kimlik doğrulama, gönderici itibarının temel direklerinden biridir. Posta kutusu sağlayıcıları, kimlik doğrulamayı temel bir güven sinyali olarak kullanır. Gelen kutusuna yerleşim garantisi değildir -- hâlâ temiz listelere, düşük şikayetlere ve iyi etkileşime ihtiyacınız var -- ama kimlik doğrulama olmadan, yaptığınız diğer her şey baltalanır.
İşte her kimlik doğrulama seviyesinde ne olur:
- Kimlik doğrulama yok: Büyük sağlayıcıların çoğu e-postanızı ya spam klasörüne atacak ya da doğrudan reddedecektir. Gmail, 2024 gönderici gereksinimleri güncellemesinden bu yana bu konuda giderek daha agresif davranıyor.
- Yalnızca SPF: Hiç yoktan iyidir, ama boşluklar bırakıyorsunuz. Yönlendirilen e-postalar SPF'i bozacak ve görünür Kimden alanındaki alan adı sahteciliğine karşı koruma yok.
- SPF + DKIM: Önemli ölçüde daha iyi. Hem sunucu yetkisini hem de mesaj bütünlüğünü kanıtlıyorsunuz. Ama DMARC olmadan, politika ve rapor yok -- başarısızlıkların ne zaman olduğunu bilemezsiniz.
- SPF + DKIM + DMARC (reject): Altın standart. Tam kimlik doğrulama, tam koruma, tam görünürlük. Gmail ve Yahoo'nun toplu göndericilerden istediği budur ve her alan adının hedeflemesi gereken şeydir.
Birden fazla gönderim servisi kullanıyorsanız kimlik doğrulama özellikle kritiktir. Alan adınız adına gönderim yapan her ESP, CRM, yardım masası ve işlemsel e-posta sistemi düzgün şekilde kimlik doğrulaması yapmalıdır. Tek bir kimlik doğrulaması yapılmamış gönderici, tüm alan adınızın itibarını düşürebilir. Kimlik doğrulama durumunuzu izlemek ve sorunları gelen kutusu yerleşiminizi etkilemeden yakalamak için ClearBounce'un Teslim Edilebilirlik Kiti'ni kullanın.
100%
Gmail toplu göndericilerinin 2024'ten beri SPF, DKIM ve DMARC'a sahip olması gerekiyor
10%
DMARC p=reject olan alan adlarında, DMARC olmayana göre daha yüksek gelen kutusu yerleşimi
3.1B
dünya genelinde DMARC korumalı alan adları tarafından günlük engellenen sahte e-posta
Yaygın Kimlik Doğrulama Hataları
Kimlik doğrulamayı doğru kurduğunu düşünen göndericilerin bile çoğunlukla gizli sorunları vardır. İşte en sık karşılaştığımız sorunlar:
Alan adınızın yalnızca bir SPF TXT kaydı olabilir. (Birleştirmek yerine) ikinci bir tane eklemek her ikisinin de başarısız olmasına neden olur. Bu, en yaygın SPF yapılandırma hatasıdır.
Her include:, a, mx ve redirect mekanizması bir DNS sorgusu olarak sayılır. Birçok gönderici farkında olmadan 10'u aşar ve bu, gönderilen her e-posta için SPF'in PermError döndürmesine neden olur.
Pazarlama e-postaları geçer, ama yardım masanız, CRM'iniz veya fatura sisteminiz SPF'e eklemeyi ve DKIM kurmayı unuttuğunuz için kimlik doğrulamada başarısız olur. Her gönderim servisinin kapsanması gerekir.
İzleme dönemi olmadan doğrudan reject'e geçmek, unutulmuş veya yanlış yapılandırılmış herhangi bir göndericinin e-postalarının sessizce düşürüleceği anlamına gelir. Her zaman p=none ile başlayın ve önce raporları inceleyin.
DMARC'ı p=none ile kurup raporları hiç okumamak, bir gönderici bozulduğunda, biri alan adınızı taklit ettiğinde veya daha katı bir politika uygulamaya hazır olduğunuzda fark etmeyeceğiniz anlamına gelir.
1024 bitten kısa anahtarlar kırılabilir ve saldırganların alan adınız olarak e-postaları imzalamasına olanak tanır. 2048-bit anahtarlar kullanın ve yıllık olarak döndürün. Bazı sağlayıcılar hâlâ varsayılan olarak 1024 kullanır -- kontrol edin ve yükseltin.
E-posta Kimlik Doğrulama Kontrol Listesi
Kimlik doğrulamanızın doğru kurulduğunu doğrulamak için bu kontrol listesini kullanın. Her maddeyi kontrol etmek dakikalar alır ama haftalarca sürecek teslim edilebilirlik sorunlarını önleyebilir:
| Görev | Protokol | Öncelik |
|---|---|---|
| Tüm göndericileri listeleyen tek bir SPF kaydı yayınlayın | SPF | Kritik |
| SPF'in 10'dan az DNS sorgusu kullandığını doğrulayın | SPF | Kritik |
SPF kaydını -all veya ~all ile bitirin |
SPF | Yüksek |
| Kullandığınız her e-posta servisi için DKIM kurun | DKIM | Kritik |
| 2048-bit DKIM anahtarları kullanın (1024-bit değil) | DKIM | Yüksek |
| Bir DMARC kaydı yayınlayın (p=none ile başlayın) | DMARC | Kritik |
| DMARC rapor adresini (rua) yapılandırın | DMARC | Yüksek |
| DMARC raporlarını haftalık olarak inceleyin | DMARC | Yüksek |
| İzlemeden sonra DMARC'ı p=quarantine'e yükseltin | DMARC | Orta |
| Emin olduğunuzda DMARC'ı p=reject'e yükseltin | DMARC | Orta |
| Test e-postaları gönderin ve başlıklarda geçişi doğrulayın | Tümü | Yüksek |
| Kara liste durumunu düzenli olarak izleyin | Tümü | Yüksek |
Sonuç
E-posta kimlik doğrulama artık isteğe bağlı değil. Gmail, Yahoo ve Microsoft, e-postalarınızın gelen kutusuna mı yoksa spam klasörüne mi ait olduğuna karar vermek için temel sinyal olarak SPF, DKIM ve DMARC kullanıyor. 2024 itibarıyla Gmail ve Yahoo, toplu göndericiler için üçünü de açıkça gerektiriyor -- ve eğilim açık: kimlik doğrulama gereksinimleri yalnızca daha katı hale geliyor.
İyi haber şu ki kimlik doğrulama kurmak, kalıcı faydalar sağlayan tek seferlik bir çabadır. SPF, DKIM ve DMARC kayıtlarınız düzgün yapılandırıldıktan sonra, gönderdiğiniz her e-posta oluşturdukları güvenden faydalanır. Sadece teslim edilebilirliği iyileştirmiyorsunuz -- markanızı, itibarınıza ve müşterilerinizin güvenine zarar verebilecek oltalama ve sahtecilik saldırılarından koruyorsunuz.
Ancak kimlik doğrulama, teslim edilebilirlik bulmacasının yalnızca bir parçasıdır. Geçersiz bir adrese mükemmel şekilde kimlik doğrulaması yapılmış bir e-posta hâlâ geri döner. Bir spam trap'e mükemmel şekilde imzalanmış bir e-posta hâlâ itibarınıza zarar verir. Kimlik doğrulama, posta kutusu sağlayıcılarına söylediğiniz kişi olduğunuzu söyler. E-posta doğrulama, gerçekten var olan ve sizden haber almak isteyen kişilere gönderim yaptığınızı garanti eder. Birlikte, tutarlı bir şekilde gelen kutusuna ulaşmanın temelini oluştururlar.
Henüz üç protokolü de kurmadıysanız, bugün başlayın. SPF ile başlayın, ardından DKIM, sonra izleme modunda DMARC. Yukarıdaki kontrol listesini kullanın. Gönderici itibarınız -- ve gelen kutusu yerleşiminiz -- size teşekkür edecektir.
Teslim edilebilirliğinizi koruyun.
Kimlik doğrulama, meşru bir gönderici olduğunuzu kanıtlar. Temiz listeler, sorumlu bir gönderici olduğunuzu kanıtlar. ClearBounce, geçersiz, riskli ve şüpheli e-posta adreslerini, tüm kimlik doğrulama çalışmanızı bozan bounce'ları ve kara listeye alınmaları tetiklemeden önce kaldırır.
100 ücretsiz kredi. Kredi kartı gerekmez.
Ücretsiz Doğrulamaya Başlayın